
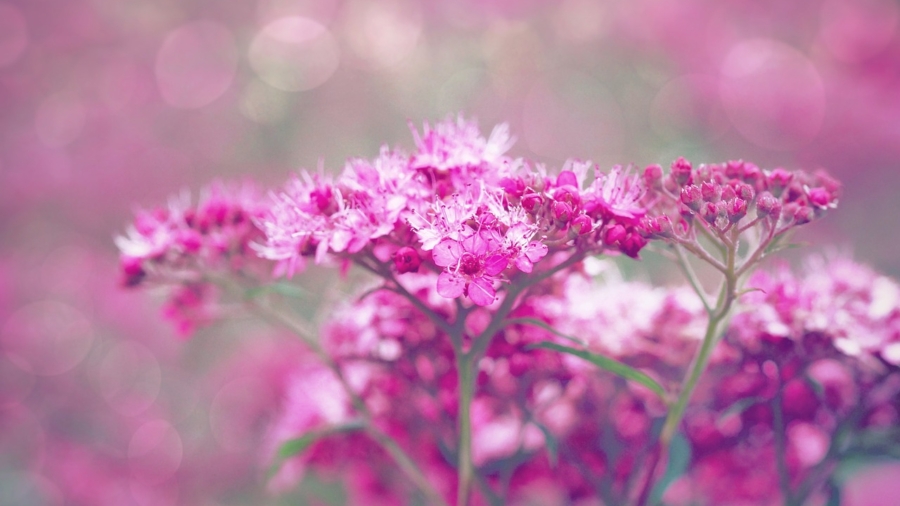
Bokeh, derived from the Japanese word “boke,” meaning “blur” or “haze,” is a popular photography technique that emphasizes the aesthetic quality of the blur produced in the out-of-focus parts of an image. This technique can transform ordinary photos into visually stunning works of art by creating dreamy, smooth backgrounds that make the subject stand out. In this comprehensive guide, we’ll explore various tips and tricks to help you master bokeh photography and create those enchanting backgrounds that captivate viewers.
Table of Contents
Understanding Bokeh
Before diving into the tips, it’s essential to understand what bokeh is and how it works. Bokeh is not just any blur; it is the pleasing quality of the out-of-focus areas in a photograph. Good bokeh enhances the subject by providing a soft, dreamy background that doesn’t distract from the main focus.
Key Factors Influencing Bokeh
- Aperture: The aperture setting on your camera plays a crucial role in creating bokeh. A wider aperture (represented by a lower f-number, such as f/1.8 or f/2.8) allows more light to enter the lens and creates a shallower depth of field. This shallow depth of field is what produces the beautiful, creamy bokeh effect.
- Lens Choice: Prime lenses, particularly those with wide maximum apertures, are ideal for bokeh photography. Lenses like the 50mm f/1.8, 85mm f/1.4, and 35mm f/1.4 are popular choices among photographers for their ability to create stunning bokeh.
- Distance: The distance between the subject and the background, as well as the distance between the subject and the camera, significantly impacts bokeh. To achieve a pronounced bokeh effect, position your subject far from the background and close to the camera.
- Background: The quality of bokeh is influenced by the background. Light sources, such as streetlights or sunlight filtering through leaves, can create beautiful bokeh shapes. Look for backgrounds with points of light or patterns to enhance the bokeh effect.
Tips for Creating Beautiful Bokeh
- Use a Wide Aperture: Set your camera to aperture priority mode and select the widest aperture available on your lens. This will create a shallow depth of field, making the background blur more pronounced.
- Get Close to Your Subject: The closer you are to your subject, the more the background will blur. Experiment with different distances to see how it affects the bokeh.
- Choose the Right Background: Pay attention to the background of your shot. Look for light sources or textured elements that will create interesting bokeh shapes. Avoid cluttered backgrounds that might distract from the subject.
- Experiment with Lens Focal Lengths: Different focal lengths produce different bokeh effects. Telephoto lenses, such as an 85mm or 135mm, are known for their ability to create smooth bokeh. Try different lenses to see which one gives you the desired effect.
- Use a Bokeh Filter: Bokeh filters are special attachments that can be placed in front of your lens to create custom bokeh shapes, such as hearts, stars, or other patterns. These filters can add a creative touch to your photos.
- Incorporate Foreground Bokeh: In addition to background bokeh, you can also create bokeh in the foreground by placing objects close to the lens. This can add depth and dimension to your photos.
Post-Processing Tips for Enhancing Bokeh
- Use Editing Software: Programs like Adobe Lightroom and Photoshop offer tools to enhance bokeh in your photos. You can adjust the brightness, contrast, and sharpness to make the bokeh stand out more.
- Add Bokeh in Post-Processing: If you didn’t capture enough bokeh in-camera, you can add it in post-processing. Use brushes and filters to create bokeh-like effects in the background of your image.
- Highlight the Subject: Use selective editing to ensure your subject remains the focal point. Blur the background further if necessary to make the subject pop.
Common Mistakes to Avoid
- Using a Narrow Aperture: A narrow aperture (high f-number) increases the depth of field, reducing the bokeh effect. Always opt for a wide aperture to achieve the desired blur.
- Ignoring the Background: A distracting or cluttered background can ruin the bokeh effect. Always be mindful of what’s behind your subject.
- Over-Processing: While post-processing can enhance bokeh, overdoing it can make the photo look unnatural. Aim for subtle enhancements that complement the natural bokeh.
FAQs
Q: What is the best lens for bokeh photography?
A: Prime lenses with wide apertures, such as the 50mm f/1.8, 85mm f/1.4, and 35mm f/1.4, are excellent choices for bokeh photography due to their ability to create a shallow depth of field.
Q: Can I create bokeh with a kit lens?
A: While it’s more challenging to achieve pronounced bokeh with a kit lens, it is possible. Use the widest aperture available and get as close to your subject as possible.
Q: How can I create custom bokeh shapes?
A: Custom bokeh shapes can be created using bokeh filters. These are special attachments that you place in front of your lens to shape the out-of-focus light sources.
Q: Is bokeh only for portrait photography?
A: No, bokeh can enhance various types of photography, including macro, nature, and still life. It adds a dreamy quality to any image where you want the subject to stand out against a soft background.
Q: Do all lenses produce the same bokeh?
A: No, different lenses produce different bokeh effects. Factors such as aperture shape, lens design, and focal length all influence the quality of bokeh.
Conclusion
Bokeh photography is a beautiful way to add a dreamy, artistic quality to your photos. By understanding the key factors that influence bokeh and applying the tips provided, you can create stunning images with smooth, captivating backgrounds. Experiment with different lenses, settings, and backgrounds to find your unique style. With practice, you’ll be able to master the art of bokeh photography and elevate your photography to new heights.
Add a Comment