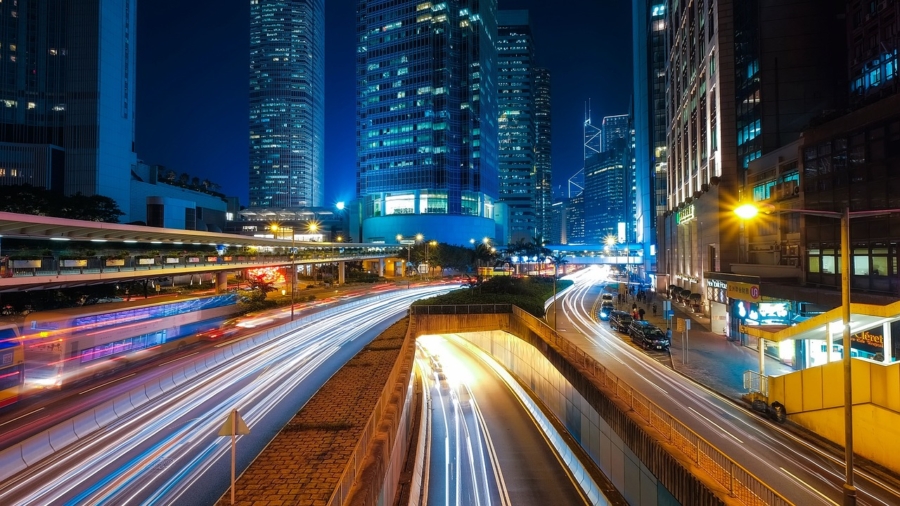
Long exposure photography can transform ordinary scenes into extraordinary visual experiences. By using longer shutter speeds, you can capture stunning light trails that add dynamism and intrigue to your photos. Whether you’re a beginner or an experienced photographer, these tips will help you achieve perfect light trails and elevate your night photography.
Table of Contents
Understanding Long Exposure Photography
Long exposure photography involves using a slow shutter speed to capture stationary elements of an image while blurring or smearing the moving elements. This technique is particularly effective at night or in low-light conditions and is often used to photograph stars, light trails from cars, fireworks, and other moving lights.
Essential Equipment for Long Exposure Photography
To get started with long exposure photography, you’ll need the following equipment:
- Camera: A DSLR or mirrorless camera with manual mode.
- Tripod: To keep your camera stable during long exposures.
- Remote Shutter Release: To prevent camera shake when pressing the shutter button.
- Neutral Density (ND) Filters: To reduce the amount of light entering the lens, allowing for longer exposures even in daylight.
- Wide-Angle Lens: To capture more of the scene light trails.
Setting Up Your Camera
Before you start shooting, it’s important to properly set up your camera. Here’s how:
- Switch to Manual Mode: This gives you full control over shutter speed, aperture, and ISO.
- Use a Low ISO: Start with ISO 100 or 200 to minimize noise.
- Set a Small Aperture: An aperture of f/8 to f/16 provides a deeper depth of field and ensures more of the scene is in focus.
- Adjust Shutter Speed: Depending on the amount of light and the effect you want, your shutter speed can range from a few seconds to several minutes.
Composing Your Shot
Composition plays a crucial role in long exposure photography. Follow these tips for a compelling shot:
- Scout Your Location: Find places with interesting light sources, like busy streets, rivers with flowing water, or amusement parks.
- Frame Your Scene: Use leading lines and the rule of thirds to guide the viewer’s eye.
- Include a Foreground Subject: This adds depth and interest to your photo.
Capturing Light Trails
Light trails are one of the most popular subjects in long exposure photography. Here’s how to capture them perfectly:
- Find a Good Spot: Position yourself where you can see a lot of moving lights, such as a busy intersection or a highway overpass.
- Set Your Exposure: Start with a shutter speed of 10-30 seconds and adjust based on the light conditions and traffic flow.
- Shoot in Bulb Mode: For exposures longer than 30 seconds, use bulb mode and a remote shutter release to open the shutter for as long as you hold down the button.
Post-Processing Tips
Post-processing can enhance your long exposure shots significantly. Here are some tips:
- Adjust Brightness and Contrast: Fine-tune the exposure to bring out details.
- Reduce Noise: Use noise reduction tools in software like Adobe Lightroom or Photoshop.
- Enhance Colors: Boost the vibrancy of the light trails and overall scene.
- Crop and Straighten: Make sure your horizon is level and remove any distracting elements.
Common Mistakes to Avoid
- Camera Shake: Always use a tripod and remote shutter release.
- Overexposure: Use ND filters to avoid blown-out highlights.
- Ignoring Composition: Plan your shots to include interesting elements and avoid clutter.
FAQs
Q1: What is the best time to shoot long exposure photos?
The best time is during the blue hour (just after sunset) or at night when there are plenty of moving lights.
Q2: How do I prevent my photos from being too noisy?
Use a low ISO setting and apply noise reduction during post-processing.
Q3: Can I shoot long exposure photos without a tripod?
While it’s possible, a tripod is highly recommended to keep your camera stable and avoid blurry images.
Q4: How long should my exposure be for light trails?
Start with 10-30 seconds and adjust based on the light conditions and the effect you desire.
Conclusion
Long exposure photography opens up a world of creative possibilities. By mastering the techniques and tips outlined in this guide, you can capture mesmerizing light trails and enhance your night photography skills. Remember to experiment with different settings and compositions to find your unique style. Happy shooting!


Add a Comment